Black pepper chicken curry, or how to lose three years’ work in two clicks

Food & drink, Food politics
How to back up your blog, or black pepper chicken curry from Christine Manfield’s Tasting India

I had a spare half hour last Wednesday lunchtime, so I decided to idly fiddle around with the layout of this site, tweaking the width of the sidebar to make it fit an ad unit more neatly.

All very easy stuff, all done from within the WordPress console through a couple of settings adjustments to the theme.

What could possibly go wrong?

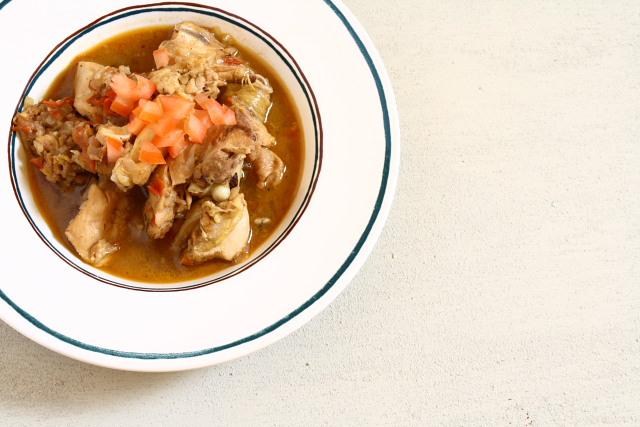
Black pepper chicken is easy.

It’s quick to make and delicately spiced. There seems to be a lot of fire in the hole if you take the ingredient list at face value, but the finished dish is much more mellow than the individual parts would suggest.

The first sign of trouble was when the theme started to go a little wonky…font sizes all over the place, columns out of whack, everything generally messed up.

Caching issue, you’d think, but flushing the various on-blog caches and blasting out Cloudflare came to naught.

Something very wrong.

Something…sinister.

Work beckoned, so I quickly ditched my normal theme and switched to one of the WordPress standard themes, and everything snapped into form.  Fairly rudimentary and dull form, but it was all there.

The site lived, wounded, but alive.

Hallelujah.

Start by dissecting a chicken into serving pieces.

I like to leave chicken on the bone, because the bones add a depth of flavour that chicken meat alone doesn’t.

Cut the legs away, then remove the crown, split it in half through the breastbone and cut each breast into five or six pieces, straight through the bone. Separate the leg from the thigh and cut through each piece with a pair of sturdy scissors.

That meat cleaver you’ve been meaning to buy from the Chinese supermarket for years?

That’d be useful.

It’s a funny feeling trying to work on serious things when, at the back of your mind, you’re panicking about the fate of three and a half years worth of writing, photography and general hard graft.  It’s unsettling and disturbing, and it made me realise just how much time and effort had gone into building this blog up, something I only really realised as I watched it slip over the edge of the abyss.

Things got worse. Much worse.

More trauma this way….

Pecan pie, or how I finally nailed pastry making

Food & drink
Pecan pie

I’ve got a very chequered history with pastry.

Sometimes, it works out OK, but not perfect, other times it’s a complete disaster.

The number of times the pastry has shrunk back from the rim of the tin, leaving a flat disk of insipid pastry with a slightly upturned lip, is uncountable.  That flat disk with the half-hearted sides, collapsing in on themselves under the sheer pathetic effort of standing up straight, is my pastry signature.

It’s rubbish.

I’ve tried plenty of methods and recipes, and I’d favoured Jamie Oliver’s ‘push it into the tin and freeze the lot’ method for a long time, on the basis that the recipe does two tins, so there’s a standby in the freezer in the event of the inevitable disappointment.

Never have I managed to produce a pastry case with sides that cling bravely to the top of the tin.

Never.

Some have come close, but close isn’t good enough.

This recipe, however, worked.

I don’t know if it’s the recipe itself that led to success, or a freak cosmic alignment of the planets or some form of divine intervention, but the results today were extremely – freakishly -good.

The filling for this outstanding pastry case was pecan nuts and lots of sugar, but that almost seems irrelevant, given the fact that the pastry worked.

It WORKED!

So, here’s how to make a superb sweet pastry case.  If you’re lucky.

Weigh out 150g of butter and 100g of caster sugar and cream them together in a food processor until pale and smooth.  You could do this by hand, but there are better things to do with your time.

Mix a large egg and an extra yolk into the butter and sugar.  Make sure all of the egg is incorporated, then sift over 270g of plain flour, pulsing it together quickly into a ball.  Don’t overdo it…just quick, light actions, just enough to draw the pastry together.

More this way…

Prime Burger, NYC

Eating out

PRIME from thismustbetheplace on Vimeo.

On Seville oranges and marmalade

Food & drink
How to make marmalade

This is a great time of year to cook.

Yes, we’re in the depths of winter, but the first signs of the year to come are starting to appear in the ground and in the shops. The first stalks of forced rhubarb are out, straight
from the groaning sheds of West Yorkshire, and it’s the middle of the blink and you’ll miss it Seville orange season.

Seville oranges have no other use other than making marmalade. You could juice them, and you could probably make a very decent sorbet, I suppose, but that’d be a waste of a fruit best used in a completely different way.

A Seville orange, you see, isn’t like an ordinary orange.

Oh no, it’s the bad boy of the orange world come good.

More below…

Starter to loaf – how to make sourdough bread

Food & drink
How to make sourdough bread, from starter to loaf

Bread is the most elemental of food.

It’s just flour, water, yeast and salt, and, in it’s most basic form, that’s it.

Go ahead and embellish it however you want, but a basic loaf is the stuff of life itself.

But, what if you were to go one step more fundamental, and use your own yeast?

It’s really very simple, and the bread made from caught and cultivated yeast is special.

It’s your loaf, one that you grew yourself.

Get your starter going

The key to any good sourdough is the starter, and it’s worth taking some time to get it right.

It could be a lifelong companion if you look after it properly.

A starter, or poolish, or levain is the heart of the loaf.  It’s the mothership of yeast that kick-starts the whole bread-making process, and all it really is is a lifeboat for trapped natural yeasts, giving them the right conditions to explode into life, ferment and grow until they’re strong enough to rise a dough.

All you need to get going is 150g of wholewheat flour mixed with 250ml of warm water in a large bowl to form a rough batter.  The flour will be full of natural yeasts, but a good beating in an electric mixer – ten minutes on a medium speed – will help to aerate the batter and catch as much airborne yeast as possible.

At this point, you’re done.

Just cover the bowl with a cloth and leave it somewhere pleasantly warm for a day.  Mine went into the airing cupboard, and did very well.

The next day, have a look.  It could be that nothing has happened, and if so, just cover the bowl again and leave it for another day, but it’s likely that there will be some gassy bubbles and the first signs of life.  If there are, add another 150g of flour and 250g of water, cover and wait another day.

The starter will start to smell as the yeast begins to kick in.  Don’t be alarmed – it isn’t going off.

For the next feeding, on the next day, discard about half of the starter before topping up with another batch of 150g of flour and 250ml of water, and repeat this every day for four or five days until the starter looks vigorous and the smell mellows out a little, losing its biting edge and becoming sweeter. If all goes well, you should have a fit and healthy starter in about a week, but there are a hundred and one things that can cause this to take longer, so just persevere.

Awakening the beast

So, your starter is ready.

Now for the bread.

Sourdough bread is made in two distinct stages – incubating the starter even further, and then forming a loaf.

The incubation period is important because it allows the starter to grow and multiply so that it’s big and strong enough to rise the dough into a loaf.

To get it really fired up, you need to give that little starter you’ve been nurturing all week a massivefeed.

Weigh out 500g of strong white flour and mix it in a large bowl with 650ml of warm water and a generous ladle-full of the starter to form what’s called a sponge.  Cover, and leave somewhere reasonably warm overnight.

When introduced to such a large amount of tasty flour and water, the wild yeast will go into a frenzy and start to multiply and grow like mad.

If you make the sponge late in the evening, by the following morning, it will be ready.

More sourdough this way…