I’ve baked sourdough regularly for a couple of years, now.
There’s been a starter bubbling away in the fridge for the whole time.
It’s remarkable in its resilience … sometimes, weeks of neglect have passed, but a handful of flour and a splash of water cause it to spring back into life easily enough.
I’ve tried several recipes, and some of them have been quite tricky – difficult and temperamental doughs that are quite wet, and hard to handle, that produce loaves with a distinct sour tang and a wide, open crumb with the big holes so coveted by sourdough bakers. Great bread, but hard work.
There needs to be something more straightforward, more accessible and just easier to make, and this is it.
This loaf has a mild taste, with just a hint of sour, and a good texture and a light, airy crumb, with a crisp and crunchy crust.
The recipe calls for 250g of starter. Use the method here to establish a starter for the first time, then just make sure to feed and water it every now and again. Be warned – it takes a week or two to get a decent starter going, so plan ahead.

Chances are, you won’t have 250g of starter just sitting in the fridge, so the night before baking, take about half of whatever you’ve got and bulk it up with enough flour and water to make a loose, fairly wet dough. Put this into a bowl and over with a plastic bag and leave overnight. The starter will feed on the massive injection of flour and water and will grow in size and vigour … come the morning, you’ll have plenty of starter to work with.
This is an important step – what you’re creating here is a pre-fermented dough, a mother dough that will be the base of the actual loaf. In France, it’s known as a poolish. It’s a vital step, and a technique that helps what are sometimes weak and feeble yeast strains to get established and strong enough to raise a loaf properly. The other important reason to do this is to let the starter develop a taste of its own … it’s the basis of the resulting loaf, so it’s right to give it time to ferment and to develop its own character.
The next morning, weigh out 250g of the starter and save a chunk in a Kilner jar in the fridge for next time. Add 375g of strong white flour, 7.5g of salt and between 130 and 175ml of tepid water – it might not all be needed, depending on how wet the original starter is – and mix to form a dough. The aim should be to draw together a soft dough that’s slightly tacky rather than sloppy or wet. Use extra flour and water to adjust the consistency of the dough.
Knead the dough for at least ten minutes, until it becomes smooth and stretches easily, and then leave it in a bowl, covered with plastic for about five hours. It needs to at least double in size.
Knock the dough back, and form it into a tight round ball, then put it, smooth side down, into a well-floured bannetone, covering again with plastic. Four or five hours later, and it should be ready for baking.
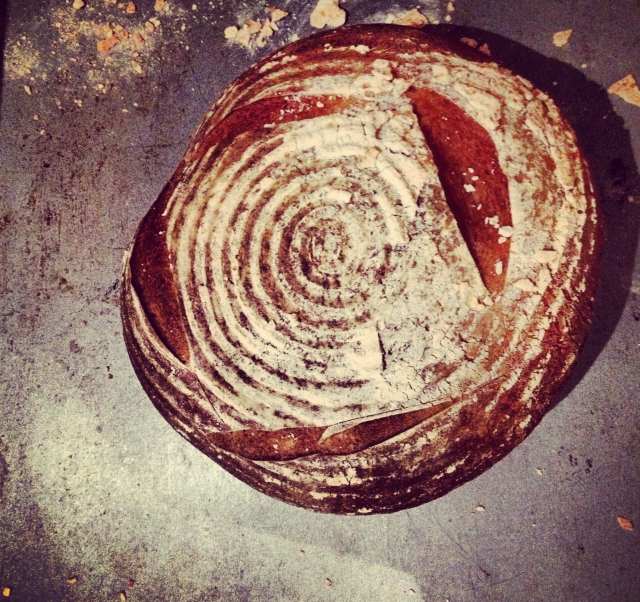
The bannetone is the key to the success of this loaf. It’s nothing more than a wicker basket that’s intended to help the dough hold its shape as it rises. You could use a bowl, but I’ve found that the dough often sticks to glass or ceramics as it’s turned out onto a baking sheet. This doesn’t happen with a bannetone, as air passes freely through it and this prevents the dough from sticking.
The biggest advantage to using a bannetone is that it leaves characteristic rings of flour on the finished loaf, that look just fantastic.

When the time to bake finally arrives, pre-heat the oven as high as it’ll go, with a baking sheet inside. Take the sheet out of the oven and quickly tip the risen dough out of the bannetone straight onto it. Slash the dough with a serrated knife, either once across the top or with four shallow cuts to form a square.
Slide the tray into the oven, and put a baking tray of boiling water on the very base. Turn the temperature down to 200c and bake for half an hour, then turn the loaf around and bake for another quarter of an hour, or until the loaf sounds hollow when tapped underneath.
Leave to cool completely before slicing, if you can manage that …
This is adapted from Paul Hollywood’s method. His TV show on bread baking unlocked much of the mystery for a lot of people – timely, relevant and informative telly.