I used to think that sourdough had to be, well, sour … that it had to have a deep, acidic taste that almost made you wince. The more sourness, the better, and my trick was to let the dough rise for extraordinarily long periods of time, to let the acidity that’s a by-product of fermentation and bacterial growth develop and take centre-stage in the taste of the loaf.
Those loaves were good, a particular type of sourdough that nods more towards the very acidic and heavy breads of Eastern Europe, but there’s another way to look at sourdough.
The French style of sourdough is much lighter and sweeter, and the French taste leans much more towards avoiding sourness altogether while still hitting that mark of crisp crust and huge holes characteristic of the very best slow fermented breads. The balance is one between the way the yeast is introduced, via a relatively young levain that’s had a night to develop its character, and the combination of white and whole wheat flour.
The resulting bread is quintessentially French, in both taste and appearance.
Making a pain au levain is dependent on a sourdough starter being available. Despite what you might have heard, starting a starter and keeping it going is very easy indeed, and once it’s up and running, it needs only the barest attention, perhaps five minutes a week or less. Having a sourdough starter resting in a Kilner jar in the fridge is a wonderful thing. There are instructions on how to get started with sourdough here, and remember that it’ll need a week or so to establish properly.
The first thing to do is to mix the levain. ‘Levain‘ is the French name for the leavening agent that’s used to raise the bread … it’s really a vehicle to feed and carry the yeast into the finished dough. To make a levain, mix together 45g of an established sourdough starter, 50g of water, 95 g of strong white flour and 5g of whole wheat flour into a rough dough, cover with a plastic bag and leave at room temperature overnight. The small amount of yeast in the sourdough starter will feed voraciously on the new flour and water, and the levain will start to bubble and grow. Any length of time between eight and twelve hours is enough to grow a good levain – mix the levain in the evening, and it should be ready to go in the morning.
When it’s time to bake, weigh out 350g of tepid water, 350g of plain, strong, white flour, 120g of wholewheat flour and 30g of rye flour and mix them together so that all of the water is absorbed and there’s no dry flour left. Leave the rough dough to stand for about half an hour to let the flour hydrate properly, then add 125g of levain and 10g of salt. The remaining levain goes in the fridge, or gets added to your original sourdough starter, for next time.
Work the salt and levain into the dough and knead, either by hand for up to a quarter of an hour, or for about nine or ten minutes in a mixer. Cover, and let the dough rise for an hour – it won’t rise a noticeable amount, but the fermentation process will be well underway after an hour. Wild yeast doesn’t produce the big, gassy rises in dough that commercial yeast does, but it does the same job, just over a longer period.
Once an hour is up, stretch the dough by lifting one edge out of the bowl and stretching it over the top of the rest of the dough. Do this a couple of times to make sure that all of the dough is sufficiently stretched, a process that aerates and invigorates the yeast.
The next fermentation is much longer – two or three hours – and it’s during this time that the flavour of the finished loaf is established. The dough will feel soft to the touch, with a gentle springiness to it.
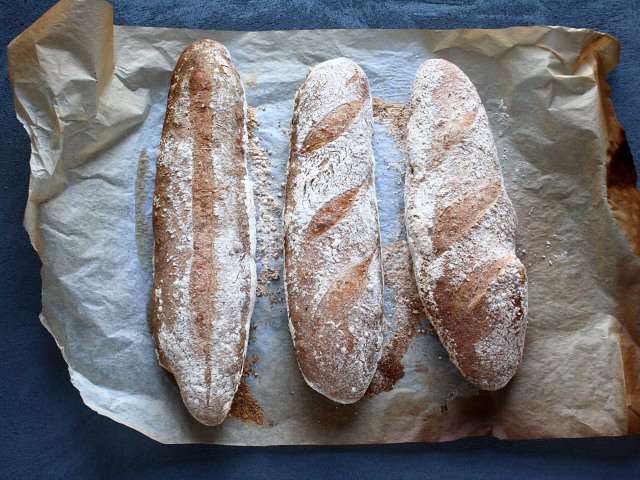
After the bulk fermentation, knock the dough back and knead it briefly, before dividing it into two. The best shape for a pain au levain is a bâtard, which is really just a shorter, stubbier baguette. It’s easy to shape:
- Press the dough into a rectangle measuring about 20cm on its longest edge.
- Working on the long edge, fold a third of the dough back on itself, from the top down, pressing the edge firmly into the centre of the dough. Lift the bottom edge right up over the top to meet the other edge and press this join firmly with the heel of you hand along its whole length, to seal it properly.
- Stretch the dough out into a fat cylinder by rocking it back and forth with the palms of both hands, working from the centre outwards. Finish the bâtard by increasing the pressure when rocking the ends to tape them slightly. The bâtard should be about a foot long.
Transfer each bâtard onto a large piece of floured greaseproof paper, ideally laid across a baker’s peel or a rimless baking tray (this just makes moving the bâtards around easier). The flour on the greaseproof paper is important.
Leave plenty of room between each bâtard, then ruck the greasproof paper up so that the bâtards are butting up against and supporting each other, separated by the floured paper. Use a couple of tightly rolled tea towels or cloths to support each external side.
The bâtards must prove for another hour and a half, until they’ve risen by about fifty percent.
Cool completely before slicing.